How-To Ripping UHD BluRays with Dolby Vision

Like many others, I rip movies so that I can watch them more easily with tools like Plex or Jellyfin. With tools like MakeMKV, BluRay discs can be ripped and enjoyed similarly to DVDs of old. However with UHD BluRays, containing Dolby Vision, things are a little more complicated.

UHD BluRays with Dolby Vision generally have poor player compatibility with basic ripping. Specifically, BluRays with an Enhancement Layer for Dolby Vision, aka Profile 7, require more processing power for playback. This higher playback requirement results in devices from streaming sticks to desktop PCs being unable to playback these rips.

The solution demonstrated in this post optimizes for compatibility by converting Profile 7 rips to Profile 8. To be clear, converting to Profile 8 involves a loss of quality. I don’t mean to say that the underlying video stream is compressed or altered in anyway, but that the Dolby Vision metadata has less quality with Profile 8 than Profile 7.

If you have a setup that works with Profile 7, feel free to ignore this post. Alternatively, you could bother device manufacturers to support Profile 7 to help the rest of us out.

Rip the BluRay with MakeMKV

The first step here is to rip the disc with MakeMKV. If you’re not already setup to do this, refer to this guide on the MakeMKV forums. Choose whatever settings you want and then rip the disc to an .mkv file.
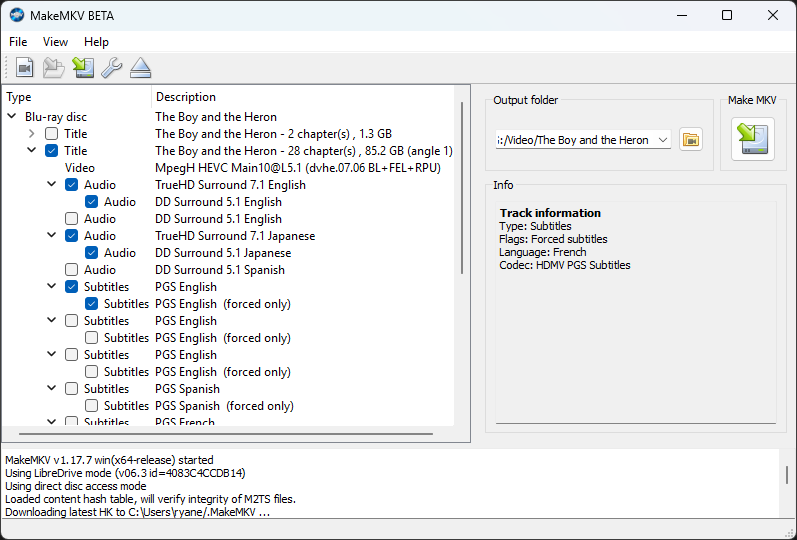
Ripping a Disc in MakeMKV

Check if the file has Profile 7

After MakeMKV rips the disc, you should have a playable video file with the Dolby Vision metadata intact. At this point, we need to check what metadata exists. Almost all UHD BluRays with Dolby Vision support are released with some variant of Profile 7: either with a Minimum Enhancement Layer or a Full Enhancement Layer. However, it is technically possible to author a BluRay with alternative profiles, so we should check just to be safe.

In order to check the file, just run ffprobe on it:

> ffprobe '.\The Boy and the Heron_t01.mkv'
  Stream #0:0(eng): Video: hevc (Main 10), yuv420p10le(tv, bt2020nc/bt2020/smpte2084), 3840x2160 [SAR 1:1 DAR 16:9], q=2-31, 23.98 fps, 23.98 tbr, 23.98 tbn
    Metadata:
      BPS-eng         : 81313117
      DURATION-eng    : 02:03:56.929500000
      NUMBER_OF_FRAMES-eng: 178308
      NUMBER_OF_BYTES-eng: 75589985204
      SOURCE_ID-eng   : 001011
      _STATISTICS_WRITING_APP-eng: MakeMKV v1.17.7 win(x64-release)
      _STATISTICS_WRITING_DATE_UTC-eng: 2024-07-26 22:03:40
      _STATISTICS_TAGS-eng: BPS DURATION NUMBER_OF_FRAMES NUMBER_OF_BYTES SOURCE_ID
    Side data:
      DOVI configuration record: version: 1.0, profile: 7, level: 6, rpu flag: 1, el flag: 1, bl flag: 1, compatibility id: 6
Stream mapping:
  Stream #0:0 -> #0:0 (copy)
Press [q] to stop, [?] for help
frame=178308 fps=661 q=-1.0 Lsize=73820752kB time=02:03:56.76 bitrate=81317.6kbits/s speed=27.6x
video:73818345kB audio:0kB subtitle:0kB other streams:0kB global headers:0kB muxing overhead: 0.003261%

From the above snippet we can see that the ripped file indeed has Profile 7.

Extracting the Dolby Vision Metadata

In order to convert the Profile 7 data to Profile 8, we turn to our good friend dovi_tool. dovi_tool has support for adding, removing, and converting Dolby Vision metadata within a HEVC stream.

In order to convert the Profile 7 metadata, we first need to extract the HEVC bitstream from our file.

> ffmpeg -i '.\The Boy and the Heron_t01.mkv' -map 0:0 -vcodec copy video.hevc
  Stream #0:0(eng): Video: hevc (Main 10), yuv420p10le(tv, bt2020nc/bt2020/smpte2084), 3840x2160 [SAR 1:1 DAR 16:9], q=2-31, 23.98 fps, 23.98 tbr, 23.98 tbn
    Metadata:
      BPS-eng         : 81313117
      DURATION-eng    : 02:03:56.929500000
...
    Side data:
      DOVI configuration record: version: 1.0, profile: 7, level: 6, rpu flag: 1, el flag: 1, bl flag: 1, compatibility id: 6
Stream mapping:
  Stream #0:0 -> #0:0 (copy)
Press [q] to stop, [?] for help
frame=178308 fps=661 q=-1.0 Lsize=73820752kB time=02:03:56.76 bitrate=81317.6kbits/s speed=27.6x
video:73818345kB audio:0kB subtitle:0kB other streams:0kB global headers:0kB muxing overhead: 0.003261%

Once the bitstream has been extracted, we can extract and convert the Dolby Vision metadata within it.

> dovi_tool -m 2 extract-rpu .\video.hevc
Reordering metadata... Done.

The above command will produce a RPU.bin file with the Profile 8 metadata (converted with the -m 2 flag).

Injecting Profile 8 Metadata

Now that we have the re-written metadata, we need to re-inject it back into our HEVC bitstream. But before we do that, we need to remove the Profile 7 enhancement layer. With Dolby Vision, the Enhancement Layer is a separate 1080p(1K) HEVC stream thats combined with the base 10-bit video stream to produce a combined 12-bit stream.

In order to remove the Enhancement Layer, we can “demux” the original bitstream.

> dovi_tool.exe demux .\video.hevc

This will produce two separate HEVC files: BL.hevc for the base video stream and EL.hevc for the enhancement layer.

With the base layer bitstream file, we can inject our newly converted metadata to make it a Profile 8 bitstream.

> dovi_tool.exe inject-rpu -r .\RPU.bin -i .\BL.hevc -o profile8.hevc
Parsing RPU file...
Processing input video for frame order info...
Rewriting file with interleaved RPU NALs..

Muxing back to MKV

Now that we have a Profile 8 bitstream, we need to re-mux it back into our original ripped file. For safety reasons, we need to do this in two steps: mux the Profile 8 bitstream to a temporary profile8.mkv and then mux the original file with profile8.mkv to get the final file. ffmpeg is great but seems to struggle with raw HEVC bitstreams (it could be user error, I ain’t pointing fingers). Because of this, we use mkvmerge to do the initial muxing.

In order to do this muxing, we need two more bits of info: the MaxCLL and MaxFALL values. You can grab this info by loading the original ripped file into MediaInfo and examining the video track. These values should be substituted into the below command for the --max-content-light and max-frame-light flags accordingly. While you’re in MediaInfo, double check that the Mastering display luminance and the video frame rate are correct.

> mkvmerge.exe -o .\profile8.mkv --default-duration 0:24000/1001p --fix-bitstream-timing-information 0:1 --colour-matrix 0:9 --colour-range 0:1 --colour-transfer-characteristics 0:16 --colour-primaries 0:9 --max-content-light 0:991 --max-frame-light 0:299 --max-luminance 0:1000.0 --min-luminance 0:0.0001 --chromaticity-coordinates 0:0.708,0.292,0.17,0.797,0.131,0.046 --white-colour-coordinates 0:0.3127,0.329 .\profile8.hevc
mkvmerge v82.0 ('I'm The President') 64-bit
'.\profile8.hevc': Using the demultiplexer for the format 'HEVC/H.265'.
'.\profile8.hevc' track 0: Using the output module for the format 'HEVC/H.265 (unframed)'.
The file '.\profile8.mkv' has been opened for writing.
'.\profile8.hevc' track 0: Extracted the aspect ratio information from the video bitstream and set the display dimensions to 3840/2160.
The cue entries (the index) are being written...
Multiplexing took 1 minute 42 seconds.

NOTE: The above command targets: bt.2020 color primaries, PQ transfer coefficients, bt.2020nc (non-constant) matrix coefficients, and a limited color range.

Once we have the profile8.mkv intermediary file, we can perform the final mux back with the ripped file.

> ffmpeg -i '.\The Boy and the Heron_t01.mkv' -i .\profile8.mkv -i -map 1:0 -map 0:a -map 0:s -codec copy 'The Boy and the Heron - HDR.mkv'
  Stream #0:0(eng): Video: hevc (Main 10), yuv420p10le(tv, bt2020nc/bt2020/smpte2084), 3840x2160 [SAR 1:1 DAR 16:9], 23.98 fps, 23.98 tbr, 1k tbn
    Metadata:
      BPS-eng         : 81313117
      DURATION-eng    : 02:03:56.929500000
...
frame=178308 fps=121 q=-1.0 Lsize=18788296kB time=02:03:56.93 bitrate=20695.9kbits/s speed=5.05x
video:13337014kB audio:5380842kB subtitle:40kB other streams:0kB global headers:1kB muxing overhead: 0.376107%

Closing

After the final mux is done, you should have a Profile 8 Blu-Ray rip that works on more devices. Again, if you have a setup that supports Profile 7 then you don’t need to do this. This guide focuses on compatibility and sacrifices a little bit of quality.

How-To Add Dolby Vision to a HDR10 Blu-Ray RIP

Some UHD Blu-Ray owners are in awkward position: they bought the Blu-Ray release of a movie only to find online streaming services to contain a “better” version than what they paid for. With the emergence of Dolby Vision, some UHD movies are being released to streaming services, or other digital outlets, with new HDR information while the older Blu-Ray versions are stuck with HDR10. Blu-Rays offer a bunch of benefits over their digital counterparts – such as higher bitrate video, lossless audio, and bonus features (if you’re into that sort of thing) – but the lack of Dolby Vision means that some movie watchers aren’t getting the best experience.

Thankfully, as community efforts around understanding and supporting Dolby Vision have progressed, it’s now possible to get the best of both worlds. Specifically, it’s possible to take the Dolby Vision info from an online source and add it to a Blu-Ray rip. With this method, you’ll still get all the benefits of a UHD Blu-Ray rip while also getting that extra Dolby Vision sweetness.

Tools you’ll need

Sources

NOTE: This guide will not be discussing how to obtain from an online source, but it should be fairly easy to do.

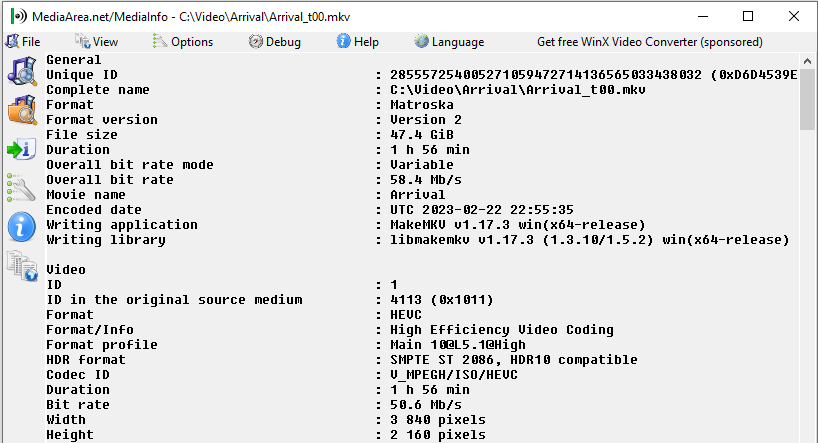
For this guide, we’ll be looking at the movie Arrival which was distributed with a HDR10 source but is distributed online with Dolby Vision. We can confirm this by looking at the MediaInfo report of our rip:

Arrival Blu-Ray rip Info

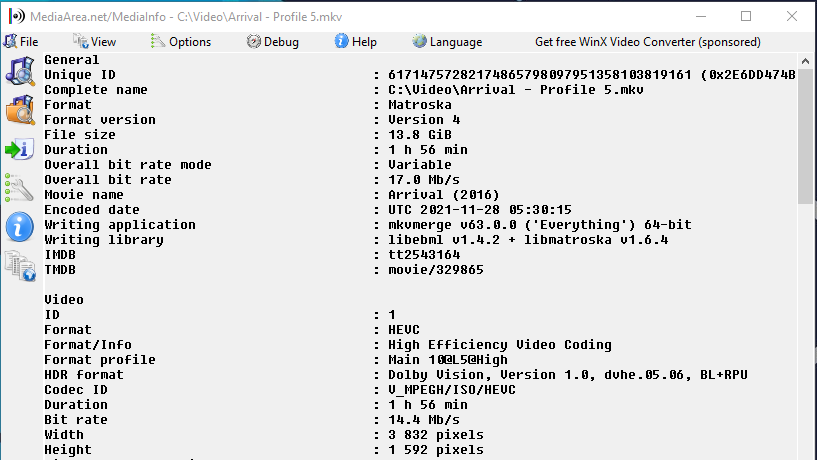
As you can see from the above, the HDR format is SMPTE ST 2086, HDR10 compatible without any Dolby-Vision information. Compare the above to our online source below:

Arrival Online Source Info

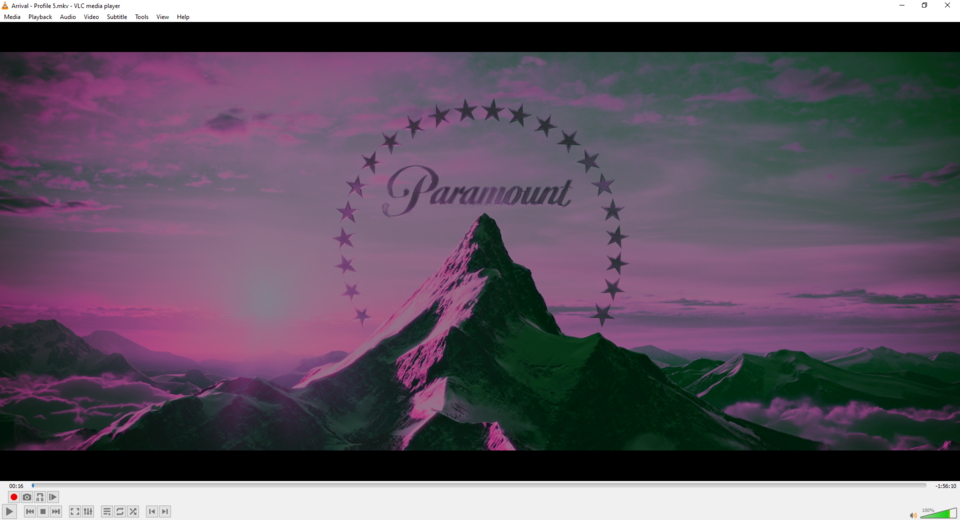
From the online source, we see the HDR10 format as Dolby Vision, Version 1.0, dvhe.05.06, BL+RPU which translates to Dolby Vision Profile 5 for HEVC (dvhe.05). We can double-confirm this as containing Dolby Vision info by attempting to play it on something that doesn’t support Dolby Vision:

Online Source in VLC

As you can see from the VLC screenshot, the colors have a purple-ish tint to them. If the file had a HDR10 incompatibility, we would expect a light-blue washed-out tint instead.

Extracting and Injecting Dolby Vision

Once you have your sources gathered, we can actually start extracting the Dolby Vision metadata from our online source. In order to do that, we must first extract the video stream from our online source. In order to do that, we use ffmpeg. First find the video stream by probing the video:

> ffprobe '.\Arrival - Profile 5.mkv'
ffprobe version 5.1.2-full_build-www.gyan.dev Copyright (c) 2007-2022 the FFmpeg developers
  built with gcc 12.1.0 (Rev2, Built by MSYS2 project)
Input #0, matroska,webm, from '.\Arrival - Profile 5.mkv':
  Metadata:
    creation_time   : 2021-11-28T05:30:15.000000Z
    encoder         : libebml v1.4.2 + libmatroska v1.6.4
    Title           : Arrival (2016)
    IMDB            : tt2543164
    TMDB            : movie/329865
  Duration: 01:56:26.51, start: 0.000000, bitrate: 16955 kb/s
  Chapters:
    ...
  Stream #0:0: Video: hevc (Main 10), yuv420p10le(tv), 3832x1592 [SAR 1:1 DAR 479:199], 23.98 fps, 23.98 tbr, 1k tbn (default)
    Metadata:
      title           :
      BPS             : 14434899
      DURATION        : 01:56:22.684000000
      NUMBER_OF_FRAMES: 167417
      NUMBER_OF_BYTES : 12599292328
      _STATISTICS_WRITING_APP: mkvmerge v63.0.0 ('Everything') 64-bit
      _STATISTICS_WRITING_DATE_UTC: 2021-11-28 05:30:15
      _STATISTICS_TAGS: BPS DURATION NUMBER_OF_FRAMES NUMBER_OF_BYTES
    Side data:
      DOVI configuration record: version: 1.0, profile: 5, level: 6, rpu flag: 1, el flag: 0, bl flag: 1, compatibility id: 0
  Stream #0:1(eng): Audio: dts (DTS), 48000 Hz, 5.1(side), s32p (24 bit), 1536 kb/s (default)
    ...
  Stream #0:2(eng): Subtitle: subrip
    ...
  Stream #0:3(eng): Subtitle: subrip (hearing impaired)
    ...
  Stream #0:4(spa): Subtitle: subrip
    ...

From our ffprobe output, we can see that Stream 0:0 is our video stream so that’s the one we’ll be extracting:

> > ffmpeg -i '.\Arrival - Profile 5.mkv' -map 0:0 -vcodec copy profile5.hevc
...
frame=167417 fps=388 q=-1.0 Lsize=12303996kB time=01:56:22.51 bitrate=14435.2kbits/s speed=16.2x
video:12303996kB audio:0kB subtitle:0kB other streams:0kB global headers:0kB muxing overhead: 0.000000%

Once the video hasn’t been extracted, we can then use it to extract the Dolby Vision metadata using quietvoid’s excellent dovi-tool. Since we’ll be adding this metadata to a HDR10 source, we need to make the metadata compatible. Specifically, we’ll be converting from Profile 5 metadata to Profile 8.1 metadata which is backwards compatible with HDR10. One benefit to this is that the resultant video will still work with displays that don’t support Dolby Vision.

> dovi_tool.exe -m 2 extract-rpu .\profile5.hevc
Reordering metadata... Done.

After the metadata has been extracted, we can inject it into our Blu-Ray rip. Similarly to our online source, we need to extract the video stream before dovi_tool can work with it.

> ffmpeg -i .\Arrival_t00.mkv -map 0:0 -vcodec copy video.hevc
ffmpeg version 5.1.2-full_build-www.gyan.dev Copyright (c) 2000-2022 the FFmpeg developers
...
  Stream #0:0(eng): Video: hevc (Main 10), yuv420p10le(tv, bt2020nc/bt2020/smpte2084), 3840x2160 [SAR 1:1 DAR 16:9], q=2-31, 23.98 fps, 23.98 tbr, 23.98 tbn
    Metadata:
      BPS-eng         : 50600247
      DURATION-eng    : 01:56:22.642333333
      NUMBER_OF_FRAMES-eng: 167416
      NUMBER_OF_BYTES-eng: 44165426831
      SOURCE_ID-eng   : 001011
      _STATISTICS_WRITING_APP-eng: MakeMKV v1.17.3 win(x64-release)
      _STATISTICS_WRITING_DATE_UTC-eng: 2023-02-22 22:55:35
      _STATISTICS_TAGS-eng: BPS DURATION NUMBER_OF_FRAMES NUMBER_OF_BYTES SOURCE_ID
Stream mapping:
  Stream #0:0 -> #0:0 (copy)
Press [q] to stop, [?] for help
frame=167416 fps=116 q=-1.0 Lsize=43136744kB time=01:56:22.60 bitrate=50608.1kbits/s speed=4.84x
video:43130300kB audio:0kB subtitle:0kB other streams:0kB global headers:1kB muxing overhead: 0.014942%

And then we inject the metadata:

> dovi_tool.exe inject-rpu -i .\video.hevc -r .\RPU.bin -o injected.hevc
Parsing RPU file...
Processing input video for frame order info...

Warning: mismatched lengths. video 167416, RPU 167417
Metadata will be skipped at the end to match video length

Rewriting file with interleaved RPU NALs..

Metadata from the online source might not match perfectly with the BluRay (see the incompatible length warning above) but should be okay for most cases.

Re-authoring

Once you have the injected HEVC file, you can re-mux back into a container of your choice. Since we have a raw HEVC file, we must first mux into an intermediary container before we can mux our final product. In this way, the muxing step is at least a two step process.

Muxing with MKVToolNix

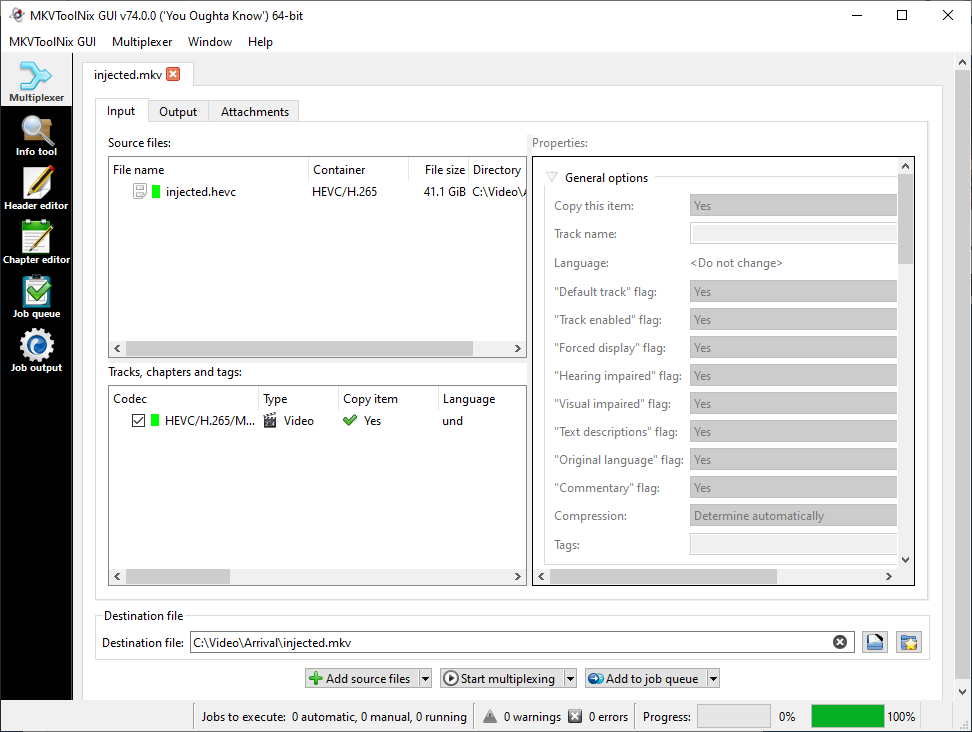
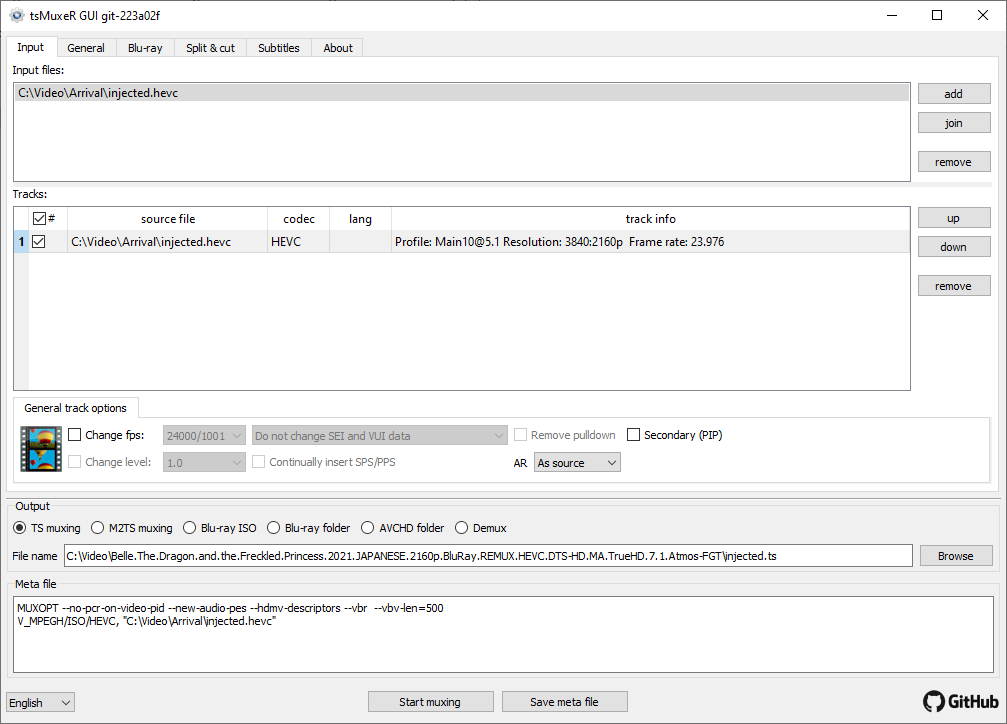
Muxing with the MKVToolNix GUI is fairly straight-forward. Simply use the Multiplexing tab and add the injected.hevc video to the multiplexing job:

Muxing with MKVToolNix

It can also be done with the mkvmerge command:

> mkvmerge.exe .\injected.hevc -o injected.mkv --default-duration 0:24000/1001p --fix-bitstream-timing-information 0:1
mkvmerge v74.0.0 ('You Oughta Know') 64-bit
'.\injected.hevc': Using the demultiplexer for the format 'HEVC/H.265'.
'.\injected.hevc' track 0: Using the output module for the format 'HEVC/H.265 (unframed)'.
The file 'injected.mkv' has been opened for writing.
'.\injected.hevc' track 0: Extracted the aspect ratio information from the video bitstream and set the display dimensions to 3840/2160.
The cue entries (the index) are being written...
Multiplexing took 27 minutes 16 seconds.

In my limited experience, the MKV muxer sometimes produces a broken video stream when muxed into the final product. The instructions here are left for completeness, but it’s recommended to use tsMuxer instead.

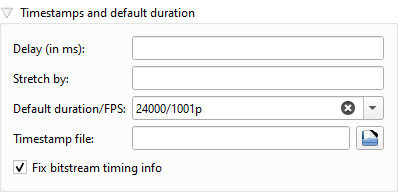
Make sure to enable the Fix bitstream timing info option when using muxing:

Fix bitstream timing info

Muxing with tsMuxer

Muxing with the tsMuxer GUI is much the same as MKVToolNix

Muxing with MKVToolNix

Muxing with mp4muxer

mp4muxer is used similarly to the mkvmerge tool:

> mp4muxer.exe -i .\injected.hevc --dv-profile 8 --dv-bl-compatible-id 1 -o .\injected.mp4

For some devices, you may need to use the --dvh1flag flag.

Once you’ve muxed to the intermediary container, you can mux back into the Blu-Ray rip with ffmpeg.

> ffmpeg -i .\Arrival_t00.mkv -i .\injected.mkv -map 1:0 -map 0:a -map 0:s -codec copy 'Arrival-DV.mkv'
ffmpeg version 5.1.2-full_build-www.gyan.dev Copyright (c) 2000-2022 the FFmpeg developers
...
Stream mapping:
  Stream #1:0 -> #0:0 (copy)
  Stream #0:1 -> #0:1 (copy)
  Stream #0:2 -> #0:2 (copy)
  Stream #0:3 -> #0:3 (copy)
  Stream #0:4 -> #0:4 (copy)
  Stream #0:5 -> #0:5 (copy)
  Stream #0:6 -> #0:6 (copy)
  Stream #0:7 -> #0:7 (copy)
  Stream #0:8 -> #0:8 (copy)
  Stream #0:9 -> #0:9 (copy)
  Stream #0:10 -> #0:10 (copy)
  Stream #0:11 -> #0:11 (copy)
Press [q] to stop, [?] for help
[matroska @ 00000228e58cf6c0] Starting new cluster due to timestampe=57608.0kbits/s speed=3.99x
frame=167416 fps= 95 q=-1.0 Lsize=49792957kB time=01:56:22.65 bitrate=58416.7kbits/s speed=3.96x
video:43163882kB audio:6509135kB subtitle:104370kB other streams:0kB global headers:1kB muxing overhead: 0.031281%

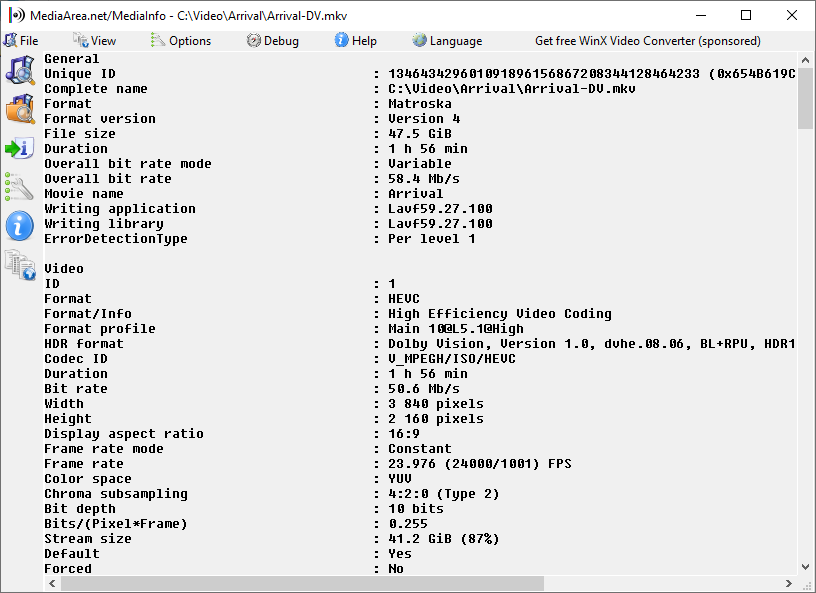
which should result in:

Injected MediaInfo

How-To compile libimobiledevice

This is a quick post about how to compile libimobiledevice for use in a dev environment. The difference here being that the resultant builds are not installed to /usr/ or /usr/local directories, but are instead contained within their original repository paths.

Compile libplist

$ git clone git@github.com:libimobiledevice/libplist.git
$ cd libplist
$ mkdir build
$ autoreconf --install
$ ./autogen.sh --prefix=`pwd`/build
$ make
$ make install
$ # Save the built directory path so the dependencies can use it
$ export LIBPLIST_PATH=`pwd`/build/

Compile libimobiledevice-glue

$ git clone git@github.com:libimobiledevice/libimobiledevice-glue.git
$ cd libimobiledevice-glue
$ mkdir build
$ autoreconf --install
$ PKG_CONFIG_PATH=$LIBPLIST_PATH/lib/pkgconfig ./configure --prefix=`pwd`/build
$ make
$ make install
$ # Save the built directory path so the dependencies can use it
$ export GLUE_PATH=`pwd`/build/

Compile libusbmuxd

$ git clone git@github.com:libimobiledevice/libusbmuxd.git
$ cd libusbmuxd
$ mkdir build
$ autoreconf --install
$ PKG_CONFIG_PATH="$LIBPLIST_PATH/lib/pkgconfig:$GLUE_PATH/lib/pkgconfig" ./configure --prefix=`pwd`/build
$ make
$ make install
$ # Save the built directory path so the dependencies can use it
$ export LIBUSBMUXD_PATH=`pwd`/build

Compile libimobiledevice

$ git clone git@github.com:libimobiledevice/libimobiledevice.git
$ cd libimobildevice
$ mkdir build
$ autoreconf --install
$ PKG_CONFIG_PATH="$LIBPLIST_PATH/lib/pkgconfig:$GLUE_PATH/lib/pkgconfig:$LIBUSBMUXD_PATH/lib/pkgconfig" ./configure --prefix=`pwd`/build
$ make
$ make install
$ # Save the built directory path so the dependencies can use it
$ export LIBIMOBILEDEVICE_PATH=`pwd`/build

Add the --enable-debug flag to ./configure to enable debug output.

[OPTIONAL] Compile usbmuxd

$ git clone git@github.com:libimobiledevice/usbmuxd.git
$ cd usbmuxd
$ mkdir build
$ autoreconf --install
$ PKG_CONFIG_PATH="$LIBPLIST_PATH/lib/pkgconfig:$GLUE_PATH/lib/pkgconfig:$LIBUSBMUXD_PATH/lib/pkgconfig:$LIBIMOBILEDEVICE_PATH/lib/pkgconfig" ./autogen.sh --prefix=`pwd`/build
$ make
$ make install
$ # Save the built directory path so the dependencies can use it
$ export USBMUXD_PATH=`pwd`/build

[OPTIONAL] Compile ideviceinstaller

$ git clone git@github.com:libimobiledevice/ideviceinstaller.git
$ cd ideviceinstaller
$ mkdir build
$ autoreconf --install
$ PKG_CONFIG_PATH="$LIBPLIST_PATH/lib/pkgconfig:$LIBUSBMUXD_PATH/lib/pkgconfig:$LIBIMOBILEDEVICE_PATH/lib/pkgconfig" ./autogen.sh --prefix=`pwd`/build
$ make
$ make install

Flashing a Cisco Access Point

Note: This article is largely thanks to David Chidell’s post.

I ran into an issue this weekend where my spare APs were on the wrong IOS version and needed to be updated; this quick post goes over how to flash an IOS image onto a Cisco Access Point.

In order to flash an AP, you need a couple of things: a TFTP server, an ethernet connection between the server and the AP to be flashed, and the IOS image to flash with. For TFTP Servers, Tftpd64 for Windows is pretty great and so is TftpServer for macOS. IOS images are distributed as .tar files and can be downloaded from Cisco Support.

Step 0: Booting into ROMMON

The first step towards flashing an AP is to get the device into ROMMON (recovery mode). An easy way to do this is is to boot the AP with the MODE button held down until the status LED turns red. Once booted into ROMMON, the serial window should display a shell prompt like so:

...
Boot into AP recovery mode
button is pressed, wait for button to be released...
button pressed for 21 seconds
process_config_recovery: set IP address and config to default 10.0.0.1
process_config_recovery: image recovery
image_recovery: Download default IOS tar image tftp://255.255.255.255/ap1g1-k9w7-tar.default

examining image...
%Error opening tftp://255.255.255.255/ap1g1-k9w7-tar.default (connection timed out)
ap: 

Step 1: Setup Networking

Now that we can configure the Access Point, we need to enable networking so that it can communicate with the TFTP Server. We can do this by issuing the following commands:

ap: set IP_ADDR 10.0.0.3
ap: set DEFAULT_ROUTER 10.0.0.1
ap: set NETMASK 255.255.255.0
ap: ether_init

The above commands will set the AP’s IP address to 10.0.0.3/24. Even with the ether_init command, and ethernet being configured, the AP will probably not respond to pings at this stage; which is normal. To make this guide easier, we’re going to use the following network setup:

Device Address
Server 10.0.0.2
AP 10.0.0.3
Switch 10.0.0.4

Optional Step: Formatting flash:

If you’re starting from scratch with a deployment, you can easily wipe the flash: contents with the following command:

ap: format flash:
Are you sure you want to format "flash:" (all data will be lost) (y/n)?y
mifs[0]: 0 files, 1 directories
mifs[0]: Total bytes     :  131334144
mifs[0]: Bytes used      :       4096
mifs[0]: Bytes available :  131330048
mifs[0]: mifs fsck took 0 seconds.
Filesystem "flash:" formatted

This is unnecessary if you’re just updating the device as it will result in current configuration being destroyed. If you’re just updating the device, you may need to clear space in flash: by deleting old images before beginning the upgrade process.

If you’re having issues with modifying flash, you may need to run flash_init before any format operations or deletions.

Step 2: Install the Image

After networking is setup and the TFTP Server is running, it’s time to actually install the images. In order to install an image on IOS, we only need to extract the .tar file into flash:. To do this, run the below command to install the ap1g1-k9w7-tar.153-3.JBB4.tar image:

ap: tar -xtract tftp://10.0.0.2/ap1g1-k9w7-tar.153-3.JBB4.tar flash:
extracting info (285 bytes)
ap1g1-k9w7-mx.153-3.JBB4/ (directory) 0 (bytes)
ap1g1-k9w7-mx.153-3.JBB4/html/ (directory) 0 (bytes)
ap1g1-k9w7-mx.153-3.JBB4/html/level/ (directory) 0 (bytes)
ap1g1-k9w7-mx.153-3.JBB4/html/level/1/ (directory) 0 (bytes)
extracting ap1g1-k9w7-mx.153-3.JBB4/html/level/1/appsui.js (563 bytes)
...

Note: You’re probably not installing the ap1g1-k9w7-tar.153-3.JBB4.tar image, so you should update the command accordingly

Once the tar process completes, you should now be able to boot into the new image. If you formatted flash, then booting is as simple as running:

ap: boot

If you upgraded the image, you need to specify which image to boot:

ap: boot flash:ap1g1-k9w7-mx.153-3.JBB4/ap1g1-k9w7-mx.153-3.JBB4

If everything goes well, you should boot into the new image. If you upgraded to a new image, and you have multiple images installed, then a reload will cause the AP to no longer boot to the new image. You can fix this by setting the boot image with the below command:

ap# config t
ap(config)# boot system flash:ap1g1-k9w7-mx.153-3.JBB4/ap1g1-k9w7-mx.153-3.JBB4
ap(config)# end
ap# write